
Privacy screen border
A 7 m evergreen screen of Emerald cedars with Little Lime hydrangea, catmint and blue fescue softening the front.
7.2 × 2.0 m footprint
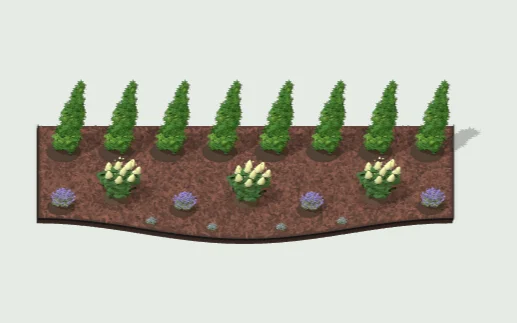
In this layout
6 products · 21 items
Select a product to highlight its items in 3D.
Plant choices
- Emerald cedar, 5 ft
- USDA zones USDA 4 minimum · Full sun · Moderate water once established
- Little Lime hydrangea, 3 gallon
- USDA zones USDA 3-9 · Full sun · Moderate water once established · Flowers: summer into fall
- Catmint 'Walker's Low', #2 pot
- USDA zones 3-8 · Full sun · Low water once established · Flowers: late spring to early fall
- Blue fescue 'Elijah Blue', #1 pot
- USDA zones 4-8 · Full sun · Low water once established · Flowers: early summer
Growing zones describe winter cold. A matching zone is a useful starting point. Sun, soil and water matter too.
Product information
6 products
From each product’s own information, shown once however many are used.
New garden bed, prepared and mulched12.96 m²
Care
First weeks
This prepared bed is soil finished with bark mulch; plants/edging are separate. Check grades and leave existing crowns, root flares and house clearances open. Pull mulch aside before planting and set each plant at its proper soil level, not into mulch.
Ongoing
Keep mulch in the bed, remove confirmed small weeds and check soil moisture below before watering. Do not dig woody material into roots to tidy it: this is surface cover, not fertilizer or potting mix. Irrigation must reach soil; damp mulch does not prove roots received water.
Seasons
After storms, rake displaced surface material back without burying crowns or drains. Measure what remains before topping up; repeating the full quoted depth builds a mound. Replace only thinning/decomposed coverage with planned material, maintaining plant/building clearances.
What's normal
Fading, settling, decomposition, fungi and variable bark/chip texture are expected. These alone are not defects. Weeding remains necessary, especially for established perennial weeds; mulch does not make a bed weed-free. Keep new weed seedlings from rooting deeply in decomposing material.
When to call
Call for washout, sour saturated material, ponding, buried crowns or plant decline. Check moisture/drainage before fertilizer or pesticide. Keep children/pets from eating fungi/unfamiliar material, and do not assume visible mushrooms require chemicals.
Confirm
Confirm soil blend/depth, bark layer, drainage and future planting plan. Plants added later need their own care; an empty prepared bed does not require automatic plant irrigation/fertilizer. Avoid changing grades near building drainage or tree roots without the installer's assessment.
Steel landscape edging, 4 in10.48 m
Care
First weeks
Steel landscape edging, 4 in defines a bed/lawn boundary. Confirm exposed height, joints and stakes/bedding at handover. It is not a step, guard or retaining wall. Learn its position before mowing and keep children clear of sharp or broken sections.
Ongoing
Brush debris away and keep soil/grass from hiding the top/stakes. Clean with water and a material/finish-compatible mild cleaner if needed. Avoid solvents, heat tools and impacts from mower blades/wheels or powered trimmers.
Seasons
After frost, rain and gardening, look for heaving, separated joins, loose supports or new trip edges. Return only loose mulch to its bed, leaving installed supports undisturbed. Keep mower wheels/blades clear at all seasonal cutting heights.
What's normal
Marks on powder-coated steel may expose it to corrosion. Protruding stakes, sharp edges, new lean or spreading rust need attention; this is coated steel, not intentional weathering steel.
When to call
Call for loose supports, recurring frost movement, broken sections or sharp/tripping edges. Isolate the hazard; never hammer blindly where services or irrigation may be buried. Have bedding/stakes corrected rather than raising soil around a failed section.
Confirm
Confirm coating/touch-up system, stake layout and safe top profile. Inspect before mowing; do not grind protection off or substitute a bare sharp strip. The steel specification reference is a material example, not proof of the installed brand.
Emerald cedar, 5 ftThuja occidentalis 'Smaragd'8
Care
First weeks
Check the original rootball and nearby soil several centimetres below the surface, especially in warm or windy weather; rain or a wet surface can hide a dry rootball. Water slowly at soil level when it is drying, soaking the roots and surrounding soil, then allow drainage. Adjust to actual moisture and local watering rules; never leave roots standing in water. Each cedar in a hedge needs its own rootball checked; one wet spot does not prove the whole row is watered. Inspect ties if present.
Ongoing
Keep a loose mulch over the root area, clear of stems, and weed by hand rather than digging through shallow roots. Maintain even moisture in draining soil, especially in the first summers and during hot wind. 'Emerald' cedar is not a dryland screen. Keep sprinklers from repeatedly wetting foliage and prevent competing turf reaching the stems. Avoid salt runoff and animal urine concentrated at the base.
Seasons
If shaping is necessary, clip lightly into green outer growth in spring or early summer and keep the base wider than the top. Never cut back into bare brown wood or remove a tall leader casually; old gaps may remain. Check for snow splaying and arrange skilled help for broken stems.
What's normal
Some shaded interior sprays naturally turn brown and fall in autumn. Browning of the entire outside, leader or one whole plant in a row is not ordinary seasonal shedding.
When to call
Contact the installer promptly for whole plants fading brown, repeated wilt, rootballs that remain dry after watering or standing water along the hedge. Dead foliage cannot be greened by fertilizer; review moisture and root health before treatment.
Confirm
Confirm the installed variety, local winter suitability, soil drainage, irrigation settings and the installer's establishment plan at handover. Confirm Thuja occidentalis 'Smaragd', hedge spacing, emitter coverage and the first-summer watering plan. Arrange stake removal if support was used.
Learn more
Little Lime hydrangea, 3 gallonHydrangea paniculata 'Jane'3
Care
First weeks
Check the original rootball and nearby soil several centimetres down, especially during warm or windy weather. Rain or damp mulch can conceal dry roots. Water slowly at soil level when it is drying, soaking the roots and surrounding soil, then allow drainage. Adjust to weather, drainage and current local watering rules; do not leave roots standing in water. Keep 'Little Lime' evenly moist through establishment and during flower development. Soil checks distinguish real drought from temporary afternoon droop.
Ongoing
Keep loose mulch over the roots, clear of stems and crowns, and hand weed without digging into shallow roots. Give sun to partial shade, with afternoon protection in very hot sites, and well-drained soil. It needs more dependable summer moisture than dryland shrubs. Avoid excess fertilizer or frequent soaking of the stems.
Seasons
This panicle hydrangea flowers on new growth made in the same year. If shaping is needed, prune in late winter/early spring before growth starts, removing weak or crossing branches and shortening remaining stems modestly. Do not hard cut in late spring or summer, when flowers are developing. Retain a sturdy framework rather than repeatedly reducing to stumps.
What's normal
Flowers open lime-green, lighten and may develop pink as they age; then dry brown. Colour is an ageing/weather response, not a blue-versus-pink soil-acidity switch. Winter leaf fall is normal.
When to call
Call for prolonged wilt despite moist soil, black or soft stem bases, repeated stem collapse or major winter dieback. Hydrangea parts are harmful if eaten; remove clippings from pet and children's areas.
Confirm
Confirm the installed variety, local winter suitability, drainage, irrigation settings and the installer's establishment plan at handover. Confirm Hydrangea paniculata 'Jane' / Little Lime, distinct from Little Lime Punch or a bigleaf hydrangea. Agree mature space, pruning height and irrigation coverage; do not add acidifiers to change these flowers blue.
Catmint 'Walker's Low', #2 potNepeta × faassenii 'Walker's Low'4
Care
First weeks
Check the original rootball and nearby soil several centimetres below the surface, especially in warm or windy weather; rain or a wet surface can hide a dry rootball. Water slowly at soil level when it is drying, soaking the roots and surrounding soil, then allow drainage. Adjust to actual moisture and local watering rules; never leave roots standing in water. Water at soil level while 'Walker's Low' roots establish, without leaving the crown buried in wet mulch.
Ongoing
Give full sun and drainage. Mature catmint tolerates dry spells, but a new plant still needs establishment water. Avoid rich feeding, which encourages floppy growth, and leave room for the mound to spread rather than cutting it into a narrow edging.
Seasons
After the first large flush fades, shorten spent flower stems and some leafy growth to encourage another flush; leave healthy basal foliage. In late winter or early spring clear last year's dead stems before new shoots extend. Divide crowded clumps in spring if flowering declines.
What's normal
It is a broad clump, despite 'Low' in the name. Flower stems can lean outward and pollinators visit heavily. Winter top growth may die away; this perennial is not expected to look like an evergreen shrub.
When to call
Call for a black or soft crown, whole-plant collapse or poor regrowth despite suitable moisture and sun. Leaves with a few insect marks rarely need treatment; check that neighbouring irrigation is not keeping roots too wet.
Confirm
Confirm the installed variety, local winter suitability, soil drainage, irrigation settings and the installer's establishment plan at handover. Confirm mature spread, the desired post-flowering trim and whether stems can overhang the path. Keep the base accessible for soil checks and route sprinklers away from the crown.
Blue fescue 'Elijah Blue', #1 potFestuca glauca 'Elijah Blue'4
Care
First weeks
Check the original rootball and nearby soil several centimetres below the surface, especially in warm or windy weather; rain or a wet surface can hide a dry rootball. Water slowly at soil level when it is drying, soaking the roots and surrounding soil, then allow drainage. Adjust to actual moisture and local watering rules; never leave roots standing in water. For this small grass, water the rootball rather than repeatedly wetting the leaf base. Its mature low-water habit develops only after roots spread.
Ongoing
Grow 'Elijah Blue' in sun and sharply drained soil; avoid rich feeding and persistently damp mulch against the tuft. Once established, allow soil to dry between needed waterings. Blue fescue often struggles more with winter wet and summer humidity than with lean soil.
Seasons
In early spring, comb out loose brown blades with gloves or trim weathered foliage above the living base before fresh growth lengthens. Spent flower stems can be clipped. Divide or replace ageing clumps if the centre dies out, retaining healthy outer sections.
What's normal
Blue-grey colour is strongest in suitable light and may dull in winter or heat. A few brown blades and a hollow centre in older clumps are common ageing features, not automatically a watering failure.
When to call
Request a drainage review for a soft, brown crown, rapid collapse or whole clumps dying after wet weather. Do not respond to browning by watering daily without checking the soil; that can worsen rot.
Confirm
Confirm the installed variety, local winter suitability, soil drainage, irrigation settings and the installer's establishment plan at handover. Confirm whether the planting is in mineral/gravel mulch or bark and agree how to keep crowns clear. Expect periodic division or replacement as normal maintenance, not a permanent turf-like cover.