
Pergola garden room
A 12 × 12 ft cedar pergola on a flagstone patio, wrapped in fragrant planting and reached by a lavender-lined pea gravel path.
7.2 × 10.8 m footprint
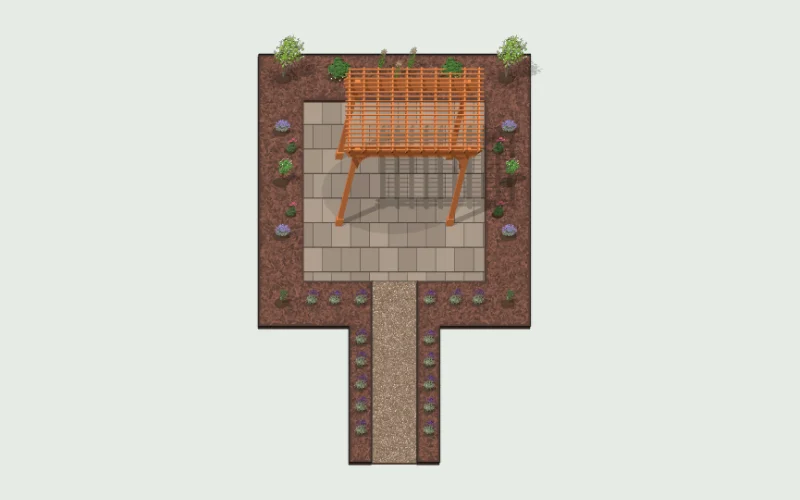
In this layout
13 products · 40 items
Select a product to highlight its items in 3D.
Plant choices
- Star magnolia, 4–5 ft
- USDA zones 4-8 · Full sun · Moderate water once established · Flowers: early spring (march)
- Mexican orange blossom, #3 pot
- USDA zones 7-9 · Full sun · Low water once established · Flowers: spring, often again in fall
- Feather reed grass 'Karl Foerster', #2 pot
- USDA zones 5-9 · Full sun · Low water once established · Flowers: early summer (plumes)
- Mock orange, #2 pot
- USDA zones 4-9 · Full sun · Low water once established · Flowers: early summer (june)
- Catmint 'Walker's Low', #2 pot
- USDA zones 3-8 · Full sun · Low water once established · Flowers: late spring to early fall
- Purple coneflower 'Magnus', #1 pot
- USDA zones 3-8 · Full sun · Low water once established · Flowers: midsummer to early fall
- Rosemary 'Tuscan Blue', #2 pot
- USDA zones 7-10 · Full sun · Low water once established · Flowers: late winter to spring
- Hidcote English lavender, 1 gallon
- USDA zones USDA 5-8 · Full sun · Moderate water once established · Flowers: summer
Growing zones describe winter cold. A matching zone is a useful starting point. Sun, soil and water matter too.
Product information
13 products
From each product’s own information, shown once however many are used.
Flagstone patio, dry-laid23.04 m²
Care
First weeks
This patio is dry-laid natural flagstone on bedding, not poured concrete. Confirm selected stone, joint fill and intended loads before use. Save a photo of finished levels/joints; keep vehicles and heavy furniture off until approved.
Ongoing
Sweep grit/leaves and blot spills. Test a material-compatible cleaner in a small area, use a soft brush and rinse gently. Avoid washing out joints, blasting faces, generic acids and wire brushes. Keep cleaner and weedkiller away from plants and drains.
Seasons
After wet/freezing weather, check low spots, rocking pieces, open joints, weeds and displaced edges. Keep drainage clear. Use a plastic-edged snow tool and approved deicer. Match the original joint system and weather requirements before any replenishment.
What's normal
Natural colour, thickness and texture vary. Moisture/weathering changes appearance and some stone splits along layers. A new trip edge or rocking flag is a support issue, not an acceptable result of natural variation.
When to call
Call for sinking, ponding, rocking pieces, lost joint fill or trip edges; keep the affected route unused. Do not pour concrete into joints, substitute another sand or hide movement with sealer. Have base, edge restraint and drainage checked.
Confirm
Confirm stone identity, frost suitability, joint filler and any sealer before selecting cleaners. Some decorative stones are acid-sensitive. Dry-laid flagstone needs compatible flexible joint care; a concrete-paver treatment is not automatically suitable.
Pea gravel, 3 in5.76 m²
Care
First weeks
This is loose rounded pea gravel over fabric and a compacted base. Confirm edging and intended use: round stone moves underfoot and may not suit every mobility aid or busy route. It is not a compacted driveway surface.
Ongoing
Remove leaves before they decompose and carefully pull small weeds. Keep gravel out of lawns, drains and door tracks. Return lightly displaced stone without digging into base/fabric. Avoid jets or blower settings that scatter stones toward people, glazing or vehicles.
Seasons
After heavy rain, check channels, washout, puddles and lost edge support. Clear visible drain inlets without altering grades. Keep snow tools above loose stone and retrieve displaced pieces before mowing. Replenish with matching material rather than covering recurring drainage faults.
What's normal
Pea gravel shifts and shows footprints; some dust and load-to-load variation is common. Exposed fabric, persistent sinking, escaping stones or unsafe footing needs correction rather than a deeper loose layer.
When to call
Call for recurring holes, washout, ponding or separating edges. Keep clear of undermined ground. Do not excavate near buried utilities or regrade runoff toward buildings, neighbours or roads; obtain assessment before machinery work.
Confirm
Confirm gravel size/depth, fabric, edging and maintenance access, plus a stable alternative route if needed. Cement, sealant or a different gravel blend changes how the path moves and drains: do not add without approval.
New garden bed, prepared and mulched31.68 m²
Care
First weeks
This prepared bed is soil finished with bark mulch; plants/edging are separate. Check grades and leave existing crowns, root flares and house clearances open. Pull mulch aside before planting and set each plant at its proper soil level, not into mulch.
Ongoing
Keep mulch in the bed, remove confirmed small weeds and check soil moisture below before watering. Do not dig woody material into roots to tidy it: this is surface cover, not fertilizer or potting mix. Irrigation must reach soil; damp mulch does not prove roots received water.
Seasons
After storms, rake displaced surface material back without burying crowns or drains. Measure what remains before topping up; repeating the full quoted depth builds a mound. Replace only thinning/decomposed coverage with planned material, maintaining plant/building clearances.
What's normal
Fading, settling, decomposition, fungi and variable bark/chip texture are expected. These alone are not defects. Weeding remains necessary, especially for established perennial weeds; mulch does not make a bed weed-free. Keep new weed seedlings from rooting deeply in decomposing material.
When to call
Call for washout, sour saturated material, ponding, buried crowns or plant decline. Check moisture/drainage before fertilizer or pesticide. Keep children/pets from eating fungi/unfamiliar material, and do not assume visible mushrooms require chemicals.
Confirm
Confirm soil blend/depth, bark layer, drainage and future planting plan. Plants added later need their own care; an empty prepared bed does not require automatic plant irrigation/fertilizer. Avoid changing grades near building drainage or tree roots without the installer's assessment.
Steel landscape edging, 4 in44.4 m
Care
First weeks
Steel landscape edging, 4 in defines a bed/lawn boundary. Confirm exposed height, joints and stakes/bedding at handover. It is not a step, guard or retaining wall. Learn its position before mowing and keep children clear of sharp or broken sections.
Ongoing
Brush debris away and keep soil/grass from hiding the top/stakes. Clean with water and a material/finish-compatible mild cleaner if needed. Avoid solvents, heat tools and impacts from mower blades/wheels or powered trimmers.
Seasons
After frost, rain and gardening, look for heaving, separated joins, loose supports or new trip edges. Return only loose mulch to its bed, leaving installed supports undisturbed. Keep mower wheels/blades clear at all seasonal cutting heights.
What's normal
Marks on powder-coated steel may expose it to corrosion. Protruding stakes, sharp edges, new lean or spreading rust need attention; this is coated steel, not intentional weathering steel.
When to call
Call for loose supports, recurring frost movement, broken sections or sharp/tripping edges. Isolate the hazard; never hammer blindly where services or irrigation may be buried. Have bedding/stakes corrected rather than raising soil around a failed section.
Confirm
Confirm coating/touch-up system, stake layout and safe top profile. Inspect before mowing; do not grind protection off or substitute a bare sharp strip. The steel specification reference is a material example, not proof of the installed brand.
Cedar pergola, 12x12 ft1
Care
First weeks
Cedar pergola, 12x12 ft uses western red cedar. Save the finish record: some items are supplied unfinished. Decide whether to allow natural weathering or maintain a colour finish; have the installer confirm suitable preparation and a compatible exterior product before coating. This is an open-slatted pergola, not a rainproof roof.
Ongoing
Brush off leaves and soil, then clean with a cedar-compatible mild cleaner, soft non-metal brush and gentle rinse when needed. Let the wood dry. Avoid aggressive pressure washing, wire brushes and household chemical mixtures. Keep sprinklers and plant growth from repeatedly wetting the wood. Keep post bases clear and ventilation open. Do not hang swings, heaters or heavy loads without approval.
Seasons
Inspect posts, beam connections, rafters and anchors before wet weather and after wind. Remove loose debris safely and keep vines controlled. Added shade cloth, roofing or a mature vine changes wind and structural loads and needs installer approval.
What's normal
Unfinished cedar gradually turns silver-grey, often unevenly in sheltered areas. Small surface checks, grain differences and some seasonal movement are common. Dark soft wood, spreading splits through connections or a new lean need attention.
When to call
Keep clear if a post leans, brace/anchor loosens, roof sags or timber is soft at a bearing point. Call the installer promptly. Report roof leaks before concealed wood damage spreads.
Confirm
Confirm anchors, finish, maintenance access and allowable attachments. A roof, hanging seat or heavy climbing plants requires installer assessment; the open pergola provides filtered shade.
Star magnolia, 4–5 ftMagnolia stellata2
Care
First weeks
Check the original rootball and nearby soil several centimetres down, especially in warm or windy weather. Rain or damp mulch can hide dry roots. Water slowly at soil level when it is drying, soaking the roots and surrounding soil, then allow drainage. Adjust to weather, drainage and current local watering rules; never leave roots standing in water. Star magnolia has sensitive shallow roots. Keep moisture even while establishing and inspect soft ties without moving the rootball.
Ongoing
Keep loose organic mulch over the roots, clear of stems and crowns, and hand weed without damaging shallow roots. Provide moist, well-drained soil and a sheltered site with sun/light shade. Avoid extremes of drought and saturation, digging over the root area or piling soil at the trunk. Summer water may still be needed on an established tree during long dry spells.
Seasons
Prune only when necessary, immediately after flowering, removing small damaged or crossing shoots. Preserve the multi-stemmed form; do not top or routinely shorten every branch. Have substantial branch work assessed professionally. Replenish mulch without covering the root flare.
What's normal
Fuzzy buds overwinter, then white flowers open before the leaves. Brown flowers following frost can be weather damage rather than a dying tree. Autumn leaf fall and a quiet bare winter framework are normal.
When to call
Ask for help with persistent wilt, blackened or sunken stem lesions, failure to leaf out after flowering or major dieback. Avoid pruning out every frost-marked flower-bearing shoot before live growth is clear. Confirm watering and drainage before feeding a stressed tree.
Confirm
Confirm the installed variety, local winter suitability, drainage, irrigation settings and the installer's establishment plan at handover. Confirm Magnolia stellata and any cultivar, local frost-pocket exposure, mature space and stake-removal review. A sheltered spot helps protect early flowers; exact bloom dates depend on local weather.
Mexican orange blossom, #3 potChoisya ternata2
Care
First weeks
Check the original rootball and nearby soil several centimetres down, especially during warm or windy weather. Rain or damp mulch can conceal dry roots. Water slowly at soil level when it is drying, soaking the roots and surrounding soil, then allow drainage. Adjust to weather, drainage and current local watering rules; do not leave roots standing in water. Protect the new Mexican orange blossom from drying wind while roots establish; a sheltered evergreen still needs summer moisture.
Ongoing
Keep loose mulch over the roots, clear of stems and crowns, and hand weed without digging into shallow roots. Use sun or partial shade and well-drained soil. Once well rooted it can tolerate short dry spells, but prolonged drought and reflected heat may cause leaf damage. Avoid excess feeding, standing water or burying the woody base.
Seasons
If shaping is needed, trim after the main spring flower display; light cutting then can encourage further growth and sometimes another flush. Remove damaged shoots after winter injury is clear. Avoid heavy late-autumn pruning that exposes soft regrowth to frost, and retain its natural rounded habit.
What's normal
Flowers may repeat in late summer under favourable conditions, but a second display is not guaranteed. Leaf scent when brushed and occasional old-leaf shedding are normal; cold may mark exposed tips.
When to call
Ask for help with persistent yellow foliage, widespread blackened shoots, repeated wilt in moist soil or whole sections dying after winter. Check both drainage and dryness before treating. A sheltered position may need reassessment if frost damage repeats.
Confirm
Confirm the installed variety, local winter suitability, drainage, irrigation settings and the installer's establishment plan at handover. Confirm the straight species or any cultivar, summer exposure, mature clearance and the timing of any shaping. Do not assume the word 'orange' means it produces an edible citrus crop.
Feather reed grass 'Karl Foerster', #2 potCalamagrostis × acutiflora 'Karl Foerster'3
Care
First weeks
Check the original rootball and nearby soil several centimetres below the surface, especially in warm or windy weather; rain or a wet surface can hide a dry rootball. Water slowly at soil level when it is drying, soaking the roots and surrounding soil, then allow drainage. Adjust to actual moisture and local watering rules; never leave roots standing in water. Check the crown area of new 'Karl Foerster' while roots establish; mature drought tolerance should not be used to withhold early watering.
Ongoing
Grow in sun or light shade with reasonably moist, draining soil. Once established it tolerates some dryness, but prolonged drought may reduce vigour. Avoid heavy nitrogen and deep shade, which encourage leaning. Keep mulch and soil from covering the growing crown.
Seasons
Leave tan stems for winter structure if they remain upright. In late winter or early spring before new blades lengthen, remove old dead stems and foliage carefully above the living crown; do not cut through emerging green shoots. Divide a congested clump in spring when needed.
What's normal
Green foliage and upright early-summer plumes turn straw-coloured with the season. Winter-brown stems are normal dormancy. This cultivar is sterile and clump-forming, so a scattering of seedlings is not expected from it.
When to call
Call for a soft crown, no spring regrowth, extensive rust or plants consistently flopping despite good light. Check wetness and airflow before more irrigation; rust or a few old brown blades does not justify routine spraying.
Confirm
Confirm the installed variety, local winter suitability, soil drainage, irrigation settings and the installer's establishment plan at handover. Confirm the cultivar and intended winter cutback timing, particularly because it starts growth early. Leave access for maintenance between the clumps.
Mock orange, #2 potPhiladelphus lewisii2
Care
First weeks
Check the original rootball and nearby soil several centimetres down, especially during warm or windy weather. Rain or damp mulch can conceal dry roots. Water slowly at soil level when it is drying, soaking the roots and surrounding soil, then allow drainage. Adjust to weather, drainage and current local watering rules; do not leave roots standing in water. New mock orange needs establishment watering, particularly on a sunny dry bank; native status does not make a nursery rootball drought-proof.
Ongoing
Keep loose mulch over the roots, clear of stems and crowns, and hand weed without digging into shallow roots. Give sun or light shade, drainage and room for arching canes. Established Philadelphus lewisii tolerates seasonal dryness better than many lush shrubs. Water in extended drought as needed, avoiding constantly wet roots and heavy fertilizer.
Seasons
Flowers are borne on older growth. Prune after flowering, shortening selected flowered shoots and gradually removing a few of the oldest canes at ground level on a mature shrub. Do not shear all stems in winter or early spring if flowers are wanted. Leave new vigorous shoots to form next year's framework.
What's normal
White fragrant flowers are followed by a plain leafy summer shrub, then winter leaf fall. A loose upright/arching form and some basal renewal growth are expected.
When to call
Call for extensive stem death, severe leaf distortion or a plant repeatedly wilting after soil moisture has been corrected. Sparse bloom can follow too much shade, hard pruning at the wrong time or an immature plant; discuss those causes before fertilizer.
Confirm
Confirm the installed variety, local winter suitability, drainage, irrigation settings and the installer's establishment plan at handover. Confirm native Philadelphus lewisii rather than a differently sized garden hybrid and agree the eventual width and post-bloom pruning plan. Check for nesting wildlife before thinning a dense shrub.
Catmint 'Walker's Low', #2 potNepeta × faassenii 'Walker's Low'4
Care
First weeks
Check the original rootball and nearby soil several centimetres below the surface, especially in warm or windy weather; rain or a wet surface can hide a dry rootball. Water slowly at soil level when it is drying, soaking the roots and surrounding soil, then allow drainage. Adjust to actual moisture and local watering rules; never leave roots standing in water. Water at soil level while 'Walker's Low' roots establish, without leaving the crown buried in wet mulch.
Ongoing
Give full sun and drainage. Mature catmint tolerates dry spells, but a new plant still needs establishment water. Avoid rich feeding, which encourages floppy growth, and leave room for the mound to spread rather than cutting it into a narrow edging.
Seasons
After the first large flush fades, shorten spent flower stems and some leafy growth to encourage another flush; leave healthy basal foliage. In late winter or early spring clear last year's dead stems before new shoots extend. Divide crowded clumps in spring if flowering declines.
What's normal
It is a broad clump, despite 'Low' in the name. Flower stems can lean outward and pollinators visit heavily. Winter top growth may die away; this perennial is not expected to look like an evergreen shrub.
When to call
Call for a black or soft crown, whole-plant collapse or poor regrowth despite suitable moisture and sun. Leaves with a few insect marks rarely need treatment; check that neighbouring irrigation is not keeping roots too wet.
Confirm
Confirm the installed variety, local winter suitability, soil drainage, irrigation settings and the installer's establishment plan at handover. Confirm mature spread, the desired post-flowering trim and whether stems can overhang the path. Keep the base accessible for soil checks and route sprinklers away from the crown.
Purple coneflower 'Magnus', #1 potEchinacea purpurea 'Magnus'4
Care
First weeks
Check the original rootball and nearby soil several centimetres down, especially during warm or windy weather. Rain or damp mulch can conceal dry roots. Water slowly at soil level when it is drying, soaking the roots and surrounding soil, then allow drainage. Adjust to weather, drainage and current local watering rules; do not leave roots standing in water. New 'Magnus' coneflower needs moisture until rooted into the bed; drought tolerance belongs to an established plant, not a dry nursery rootball.
Ongoing
Provide sun and freely draining soil. Water during prolonged dry spells when soil checks show need, particularly while flowering. Avoid continually wet crowns, heavy feeding and deep shade, which encourage rot or floppy stems. Leave space for air around the clump.
Seasons
Deadhead early flowers for tidiness or a longer display, but leave selected late seed heads for birds and winter structure. Remove old dead stems in late winter/early spring before fresh growth gets tall. Divide crowded older clumps in spring only when needed. In wet-winter climates keep runoff away from the crown.
What's normal
Pink-purple petals eventually fade and central cones remain. Winter dieback is normal and spring shoots may emerge relatively late. Some seedlings can appear where seed heads were retained.
When to call
Ask for diagnosis of stunted distorted flower heads, green abnormal flowers, spreading yellowing or a soft rotten crown. Distorted plants may need removal after a disease diagnosis; do not compost or treat them automatically. Check slugs around emerging shoots.
Confirm
Confirm the installed variety, local winter suitability, drainage, irrigation settings and the installer's establishment plan at handover. Confirm the 'Magnus' selection, full-sun exposure and drainage. Agree whether seed heads will remain and whether self-seeding is acceptable; a first-year plant may flower less than an established clump.
Rosemary 'Tuscan Blue', #2 potSalvia rosmarinus 'Tuscan Blue'2
Care
First weeks
Check the original rootball and nearby soil several centimetres down, especially in warm or windy weather. Rain or damp mulch can hide dry roots. Water slowly at soil level when it is drying, soaking the roots and surrounding soil, then allow drainage. Adjust to weather, drainage and current local watering rules; never leave roots standing in water. New rosemary needs watering while roots establish, but allow the root zone to begin drying and keep the woody base out of wet mulch.
Ongoing
Give 'Tuscan Blue' full sun, airflow and very free-draining soil. Established plants tolerate considerable dryness; avoid rich feeding and permanently moist lawn irrigation. In wet-winter climates drainage is critical, and containers need unobstructed drainage holes.
Seasons
Trim lightly after flowering or during active spring growth to keep the shrub leafy. Always leave healthy foliage below each cut: old bare wood may not reshoot. Do not cut hard just before frost. Remove confirmed winter-damaged tips once new growth shows what survived.
What's normal
Blue flowers are seasonal and strongly scented foliage is characteristic. Older inner stems become woody. A little winter bronzing or weather damage may occur, but black soft growth is not normal healthy ageing.
When to call
Ask for help with whole branches collapsing, a soft dark base, extensive frost damage or persistent yellowing in damp soil. Check roots before increasing water. Only harvest leaves after identity and any nursery/landscape treatment restrictions are confirmed; ornamental installation alone does not verify food-use practices.
Confirm
Confirm the installed variety, local winter suitability, drainage, irrigation settings and the installer's establishment plan at handover. Confirm the 'Tuscan Blue' label, local cold exposure and whether the plant shares irrigation with moisture-loving shrubs. Agree a green-growth-only trimming plan and whether culinary harvest is intended.
Hidcote English lavender, 1 gallonLavandula angustifolia 'Hidcote'16
Care
First weeks
Check the original rootball and nearby soil several centimetres below the surface, especially in warm or windy weather; rain or a wet surface can hide a dry rootball. Water slowly at soil level when it is drying, soaking the roots and surrounding soil, then allow drainage. Adjust to actual moisture and local watering rules; never leave roots standing in water. New lavender needs watering while it roots into the bed. Let the soil begin to dry before watering again and avoid soaking the woody crown.
Ongoing
Give 'Hidcote' full sun, airflow and sharply drained soil. Once established, it needs little supplemental water except during prolonged dryness; avoid wet organic mulch against stems, heavy compost and high-nitrogen feeding. Good winter drainage is especially important in wet-winter climates.
Seasons
After the main flower flush, trim spent stems and a little green leafy growth to retain a compact mound. In spring remove winter damage only after live shoots are clear. Always leave green leaves below each cut; old bare wood may not reshoot. Avoid late hard cuts before frost.
What's normal
The interior naturally becomes woody as plants age. Some lower leaf browning and winter silver-grey tones are normal; flowers attract bees. An old leggy plant may eventually be better replaced than drastically cut back.
When to call
Ask for help with sudden branch collapse, a soft black base or extensive loss after wet cold. Check drainage before adding water. Do not assume flowers or leaves are suitable for food or remedies without confirming plant identity and treatment history.
Confirm
Confirm the installed variety, local winter suitability, soil drainage, irrigation settings and the installer's establishment plan at handover. Confirm true English lavender 'Hidcote'/Hidcote Group, soil drainage and a green-growth-only trimming plan. Other lavender types have different hardiness and pruning needs.