
Edible raised bed pair
Two 1.2 × 2.4 m corrugated steel raised beds on a pea gravel pad: one of blueberries and strawberries, one of rosemary and lavender.
4.5 × 3.6 m footprint
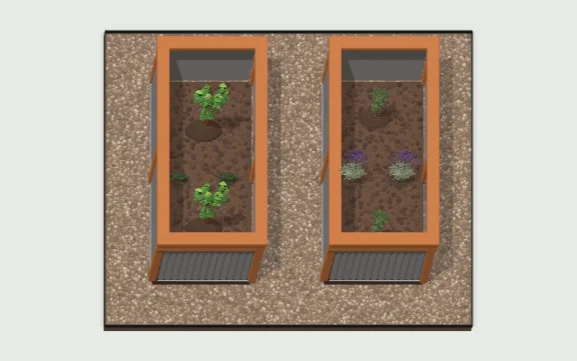
In this layout
8 products · 14 items
Select a product to highlight its items in 3D.
Plant choices
- Blueberry 'Duke', #3 pot
- USDA zones 4-8 · Full sun · High water once established · Flowers: spring
- Coastal strawberry, #1 pot
- USDA zones 4-9 · Full sun · Low water once established · Flowers: spring
- Rosemary 'Tuscan Blue', #2 pot
- USDA zones 7-10 · Full sun · Low water once established · Flowers: late winter to spring
- Hidcote English lavender, 1 gallon
- USDA zones USDA 5-8 · Full sun · Moderate water once established · Flowers: summer
Growing zones describe winter cold. A matching zone is a useful starting point. Sun, soil and water matter too.
Product information
8 products
From each product’s own information, shown once however many are used.
Pea gravel, 3 in16.2 m²
Care
First weeks
This is loose rounded pea gravel over fabric and a compacted base. Confirm edging and intended use: round stone moves underfoot and may not suit every mobility aid or busy route. It is not a compacted driveway surface.
Ongoing
Remove leaves before they decompose and carefully pull small weeds. Keep gravel out of lawns, drains and door tracks. Return lightly displaced stone without digging into base/fabric. Avoid jets or blower settings that scatter stones toward people, glazing or vehicles.
Seasons
After heavy rain, check channels, washout, puddles and lost edge support. Clear visible drain inlets without altering grades. Keep snow tools above loose stone and retrieve displaced pieces before mowing. Replenish with matching material rather than covering recurring drainage faults.
What's normal
Pea gravel shifts and shows footprints; some dust and load-to-load variation is common. Exposed fabric, persistent sinking, escaping stones or unsafe footing needs correction rather than a deeper loose layer.
When to call
Call for recurring holes, washout, ponding or separating edges. Keep clear of undermined ground. Do not excavate near buried utilities or regrade runoff toward buildings, neighbours or roads; obtain assessment before machinery work.
Confirm
Confirm gravel size/depth, fabric, edging and maintenance access, plus a stable alternative route if needed. Cement, sealant or a different gravel blend changes how the path moves and drains: do not add without approval.
Garden blend soil, 6 in5.76 m²
Care
First weeks
Garden blend is screened soil and compost over prepared ground. Confirm composition, finished level, drainage and intended plants. Keep it below siding, vents, paths and crowns; a 6-inch quote depth is not permission to raise grade over established tree roots.
Ongoing
Check moisture at root depth before watering planted areas. Protect bare soil from erosion and remove weeds before seed set. Avoid working/walking it wet, which compacts the layer. Choose mulch/feeding for the plants installed rather than assuming every blend needs identical additions.
Seasons
After rain, look for ponding, runoff, settling and exposed roots/irrigation. Correct grades through the installer rather than repeatedly adding soil. Test nutrients/pH before compost, lime or fertilizer applications. Maintain mulch without burying stems, and avoid churning saturated beds in winter.
What's normal
Some settlement and screened-material variation are common. Weeds can arise from disturbed ground or windblown seed. A new layer does not repair compacted subsoil; persistent water at the interface or repeated plant decline needs assessment.
When to call
Call for substantial sinking, erosion toward foundations, buried crowns, suspect debris or poor drainage. Diagnose before replacing plants/importing soil. Do not dig through tree roots, services or a retaining-wall support zone without assessment.
Confirm
Confirm supplier blend, organic content, settled depth, drainage suitability and any soil test. For food crops, check source/suitability. This is in-ground soil, not automatically container medium; plants still need individual establishment care. Record subsequent additions so future feeding decisions reflect what is already present.
Corrugated steel raised bed wall, 24 in14.4 m
Care
First weeks
Corrugated steel raised bed wall, 24 in is a low garden/raised-bed wall. Have the installer confirm final fill level, drainage, supports and intended use before filling or working beside it. Do not increase its height or pile soil, equipment or heavy pots at the top.
Ongoing
Keep the top and visible drain outlets clear. Direct sprinklers away and watch for water carrying soil through joints. Pull small surface weeds without disturbing stones, mesh or buried supports. Do not climb, sit or lean ladders against the wall unless approved. Keep cedar caps/posts clean and let exposed wood dry.
Seasons
Inspect after prolonged rain, frost and ground work. Compare with handover photos for new bulging, lean, loose caps, base washout or sunken ground behind it. Preserve the installer's drainage route; do not dig a new drain behind the wall yourself.
What's normal
Cedar may grey and show small checks; galvanized corrugated metal gradually dulls. Soft timber at supports, expanding splits, sharp cut edges or rust perforation requires assessment.
When to call
If the wall moves, bulges, loses fill/support or has loose top pieces, keep people clear and call. Do not restack, open a basket, pull posts or push it back while it holds soil. Structural/drainage repair needs assessment.
Confirm
Confirm whether it retains soil or is decorative, maximum fill height, safe setbacks, drains and liners. Catalogue height alone does not establish design suitability beside a slope, driveway, building or other loaded area. Confirm liner/finish suitability for edible crops and keep soil below the cap. Do not paint soil-contact faces without approval.
Steel landscape edging, 4 in16.2 m
Care
First weeks
Steel landscape edging, 4 in defines a bed/lawn boundary. Confirm exposed height, joints and stakes/bedding at handover. It is not a step, guard or retaining wall. Learn its position before mowing and keep children clear of sharp or broken sections.
Ongoing
Brush debris away and keep soil/grass from hiding the top/stakes. Clean with water and a material/finish-compatible mild cleaner if needed. Avoid solvents, heat tools and impacts from mower blades/wheels or powered trimmers.
Seasons
After frost, rain and gardening, look for heaving, separated joins, loose supports or new trip edges. Return only loose mulch to its bed, leaving installed supports undisturbed. Keep mower wheels/blades clear at all seasonal cutting heights.
What's normal
Marks on powder-coated steel may expose it to corrosion. Protruding stakes, sharp edges, new lean or spreading rust need attention; this is coated steel, not intentional weathering steel.
When to call
Call for loose supports, recurring frost movement, broken sections or sharp/tripping edges. Isolate the hazard; never hammer blindly where services or irrigation may be buried. Have bedding/stakes corrected rather than raising soil around a failed section.
Confirm
Confirm coating/touch-up system, stake layout and safe top profile. Inspect before mowing; do not grind protection off or substitute a bare sharp strip. The steel specification reference is a material example, not proof of the installed brand.
Blueberry 'Duke', #3 potVaccinium corymbosum 'Duke'2
Care
First weeks
Check the original rootball and nearby soil several centimetres below the surface, especially in warm or windy weather; rain or a wet surface can hide a dry rootball. Water slowly at soil level when it is drying, soaking the roots and surrounding soil, then allow drainage. Adjust to actual moisture and local watering rules; never leave roots standing in water. Blueberry roots are shallow and dry quickly; monitor carefully through the first summers and while fruit fills. Keep the crown clear.
Ongoing
Maintain an acidic, well-drained root zone and organic mulch without cultivating around roots. Check pH before adding amendments; general lawn fertilizer or lime can harm blueberries. Ask whether first-year flowers should be removed so a small plant establishes roots rather than carrying a heavy crop.
Seasons
Prune during winter dormancy before buds open: remove dead, weak and crossing shoots, then renew older unproductive canes gradually as the bush matures. Do not shear off all shoot tips, which carry fruit buds. 'Duke' ripens early but still needs water after harvest for next year's growth.
What's normal
Red autumn leaves and winter leaf fall are normal. Birds may take ripe fruit; a correctly fitted, wildlife-safe enclosure can help. Fruit quantity depends on age, sunlight, pollination and weather.
When to call
Report persistent yellow leaves with green veins, dying canes, shrivelled fruit despite moist soil or roots staying saturated. Diagnose soil and irrigation before feeding. Harvest only after plant identity and any treatment/harvest restrictions are confirmed.
Confirm
Confirm the installed variety, local winter suitability, soil drainage, irrigation settings and the installer's establishment plan at handover. Confirm acidic soil, an appropriate blueberry feeding plan and a compatible second cultivar with overlapping bloom for better cropping.
Coastal strawberry, #1 potFragaria chiloensis2
Care
First weeks
Check the original rootball and nearby soil several centimetres below the surface, especially in warm or windy weather; rain or a wet surface can hide a dry rootball. Water slowly at soil level when it is drying, soaking the roots and surrounding soil, then allow drainage. Adjust to actual moisture and local watering rules; never leave roots standing in water. Until coastal strawberry roots spread, keep soil evenly moist without burying the central crowns. Small plants can dry between larger neighbours.
Ongoing
Provide sun or light shade and well-drained soil. Established plants tolerate dry coastal conditions better than newly installed ones. Direct water to soil, reduce it as the mat establishes and avoid keeping foliage continuously wet. Hand weed until the mat closes.
Seasons
Guide or clip runners at bed edges before they root into paths or adjacent plants. Remove old damaged leaves and dead crowns selectively in spring; do not routinely scalp the entire planting. Where summers are dry, check beneath the leaves before assuming a dense cover needs no water.
What's normal
Runners rooting at their tips are the normal way this groundcover fills space. Some older leaves turn red or brown. Flower and fruit production varies; this ornamental groundcover is not the same as a named dessert strawberry crop.
When to call
Ask for help if whole patches collapse, crowns become soft or roots remain waterlogged. Slugs or leaf spots may damage some leaves without killing the planting. Do not eat fruit until species identity and any spray/harvest restrictions have been confirmed.
Confirm
Confirm the installed variety, local winter suitability, soil drainage, irrigation settings and the installer's establishment plan at handover. Confirm the installed species, eventual coverage and how runners will be kept within the bed. The listed spacing describes initial planting, not a permanent boundary.
Rosemary 'Tuscan Blue', #2 potSalvia rosmarinus 'Tuscan Blue'2
Care
First weeks
Check the original rootball and nearby soil several centimetres down, especially in warm or windy weather. Rain or damp mulch can hide dry roots. Water slowly at soil level when it is drying, soaking the roots and surrounding soil, then allow drainage. Adjust to weather, drainage and current local watering rules; never leave roots standing in water. New rosemary needs watering while roots establish, but allow the root zone to begin drying and keep the woody base out of wet mulch.
Ongoing
Give 'Tuscan Blue' full sun, airflow and very free-draining soil. Established plants tolerate considerable dryness; avoid rich feeding and permanently moist lawn irrigation. In wet-winter climates drainage is critical, and containers need unobstructed drainage holes.
Seasons
Trim lightly after flowering or during active spring growth to keep the shrub leafy. Always leave healthy foliage below each cut: old bare wood may not reshoot. Do not cut hard just before frost. Remove confirmed winter-damaged tips once new growth shows what survived.
What's normal
Blue flowers are seasonal and strongly scented foliage is characteristic. Older inner stems become woody. A little winter bronzing or weather damage may occur, but black soft growth is not normal healthy ageing.
When to call
Ask for help with whole branches collapsing, a soft dark base, extensive frost damage or persistent yellowing in damp soil. Check roots before increasing water. Only harvest leaves after identity and any nursery/landscape treatment restrictions are confirmed; ornamental installation alone does not verify food-use practices.
Confirm
Confirm the installed variety, local winter suitability, drainage, irrigation settings and the installer's establishment plan at handover. Confirm the 'Tuscan Blue' label, local cold exposure and whether the plant shares irrigation with moisture-loving shrubs. Agree a green-growth-only trimming plan and whether culinary harvest is intended.
Hidcote English lavender, 1 gallonLavandula angustifolia 'Hidcote'2
Care
First weeks
Check the original rootball and nearby soil several centimetres below the surface, especially in warm or windy weather; rain or a wet surface can hide a dry rootball. Water slowly at soil level when it is drying, soaking the roots and surrounding soil, then allow drainage. Adjust to actual moisture and local watering rules; never leave roots standing in water. New lavender needs watering while it roots into the bed. Let the soil begin to dry before watering again and avoid soaking the woody crown.
Ongoing
Give 'Hidcote' full sun, airflow and sharply drained soil. Once established, it needs little supplemental water except during prolonged dryness; avoid wet organic mulch against stems, heavy compost and high-nitrogen feeding. Good winter drainage is especially important in wet-winter climates.
Seasons
After the main flower flush, trim spent stems and a little green leafy growth to retain a compact mound. In spring remove winter damage only after live shoots are clear. Always leave green leaves below each cut; old bare wood may not reshoot. Avoid late hard cuts before frost.
What's normal
The interior naturally becomes woody as plants age. Some lower leaf browning and winter silver-grey tones are normal; flowers attract bees. An old leggy plant may eventually be better replaced than drastically cut back.
When to call
Ask for help with sudden branch collapse, a soft black base or extensive loss after wet cold. Check drainage before adding water. Do not assume flowers or leaves are suitable for food or remedies without confirming plant identity and treatment history.
Confirm
Confirm the installed variety, local winter suitability, soil drainage, irrigation settings and the installer's establishment plan at handover. Confirm true English lavender 'Hidcote'/Hidcote Group, soil drainage and a green-growth-only trimming plan. Other lavender types have different hardiness and pruning needs.