
Japanese maple garden
A calm island bed built around a Bloodgood Japanese maple, with dwarf Hinoki cypress, crimson azaleas and a sweep of golden Japanese forest grass.
5.0 × 4.0 m footprint
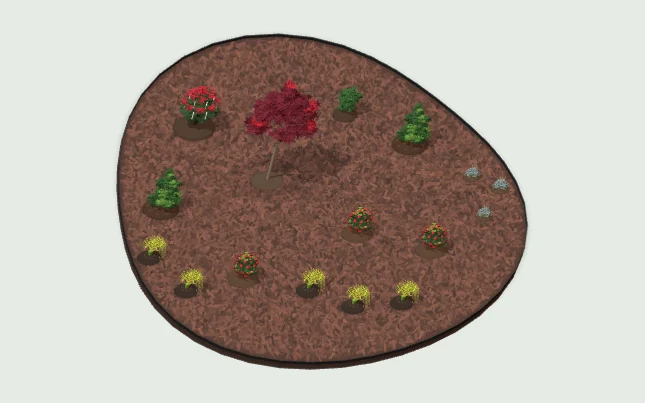
In this layout
9 products · 18 items
Select a product to highlight its items in 3D.
Plant choices
- Bloodgood Japanese maple, 5 ft
- USDA zones USDA 5-8 · Part shade · Moderate water once established
- Dwarf Hinoki cypress, #5 pot
- USDA zones 4-8 · Part shade · Moderate water once established
- Azalea 'Hino Crimson', #2 pot
- USDA zones 6-9 · Part shade · Moderate water once established · Flowers: mid spring
- Japanese forest grass, #2 pot
- USDA zones 5-9 · Part shade · Moderate water once established
- Pieris 'Mountain Fire', #3 pot
- USDA zones 5-8 · Part shade · Moderate water once established · Flowers: late winter to early spring
- Sweet box, #2 pot
- USDA zones 6-9 · Full shade · Moderate water once established · Flowers: winter (january–february)
- Blue fescue 'Elijah Blue', #1 pot
- USDA zones 4-8 · Full sun · Low water once established · Flowers: early summer
Growing zones describe winter cold. A matching zone is a useful starting point. Sun, soil and water matter too.
Product information
9 products
From each product’s own information, shown once however many are used.
New garden bed, prepared and mulched15.53 m²
Care
First weeks
This prepared bed is soil finished with bark mulch; plants/edging are separate. Check grades and leave existing crowns, root flares and house clearances open. Pull mulch aside before planting and set each plant at its proper soil level, not into mulch.
Ongoing
Keep mulch in the bed, remove confirmed small weeds and check soil moisture below before watering. Do not dig woody material into roots to tidy it: this is surface cover, not fertilizer or potting mix. Irrigation must reach soil; damp mulch does not prove roots received water.
Seasons
After storms, rake displaced surface material back without burying crowns or drains. Measure what remains before topping up; repeating the full quoted depth builds a mound. Replace only thinning/decomposed coverage with planned material, maintaining plant/building clearances.
What's normal
Fading, settling, decomposition, fungi and variable bark/chip texture are expected. These alone are not defects. Weeding remains necessary, especially for established perennial weeds; mulch does not make a bed weed-free. Keep new weed seedlings from rooting deeply in decomposing material.
When to call
Call for washout, sour saturated material, ponding, buried crowns or plant decline. Check moisture/drainage before fertilizer or pesticide. Keep children/pets from eating fungi/unfamiliar material, and do not assume visible mushrooms require chemicals.
Confirm
Confirm soil blend/depth, bark layer, drainage and future planting plan. Plants added later need their own care; an empty prepared bed does not require automatic plant irrigation/fertilizer. Avoid changing grades near building drainage or tree roots without the installer's assessment.
Bloodgood Japanese maple, 5 ftAcer palmatum 'Bloodgood'1
Care
First weeks
Check the original rootball and nearby soil several centimetres below the surface, especially in warm or windy weather; rain or a wet surface can hide a dry rootball. Water slowly at soil level when it is drying, soaking the roots and surrounding soil, then allow drainage. Adjust to actual moisture and local watering rules; never leave roots standing in water. Young 'Bloodgood' maples need regular checks through their first dry summers. Check ties if staked; they should not rub or tighten around the trunk.
Ongoing
Keep a loose mulch over the root area, clear of stems, and weed by hand rather than digging through shallow roots. Retain even moisture in well-drained soil. Give afternoon shade in hot locations and shelter from drying wind; scorching is often a site or water issue. Keep lawn equipment away from bark and the root flare visible.
Seasons
Preserve the natural crown. Remove only small dead or crossing branches as needed; have the installer choose the local pruning window, generally dormancy after leaf fall and before sap rises. Avoid spring sap-flow pruning, topping and heavy cuts. Recheck moisture during summer heat.
What's normal
Burgundy leaves can vary with shade and season, then turn bright red before autumn leaf fall. Some tip scorch can follow heat or transplant stress; damaged leaves will not turn green again.
When to call
Call for repeated scorch despite suitable moisture, one-sided wilt, black spreading stem lesions or a tree that rocks in the planting hole. An arborist should assess large branches, splits or persistent dieback.
Confirm
Confirm the installed variety, local winter suitability, soil drainage, irrigation settings and the installer's establishment plan at handover. Agree a stake-removal review, mature canopy clearance and any protection for the next heatwave.
Dwarf Hinoki cypress, #5 potChamaecyparis obtusa 'Nana Gracilis'2
Care
First weeks
Check the original rootball and nearby soil several centimetres below the surface, especially in warm or windy weather; rain or a wet surface can hide a dry rootball. Water slowly at soil level when it is drying, soaking the roots and surrounding soil, then allow drainage. Adjust to actual moisture and local watering rules; never leave roots standing in water. Slow growth does not mean low establishment water. Check beneath the dense branches and wet the rootball evenly without ponding.
Ongoing
Keep a loose mulch over the root area, clear of stems, and weed by hand rather than digging through shallow roots. Provide moist but well-drained soil in sun or part shade, protected from severe drying conditions. Keep air around the base and avoid rich feeding to force speed. The natural shell-like sprays need room; outer green foliage supports recovery.
Seasons
Usually leave 'Nana Gracilis' untrimmed. If correction is essential, shorten only a little green growth and remove dead material carefully. Do not cut into leafless brown wood or top the plant; dormant bare branches generally do not refill. Check winter drainage and soil moisture before forecast cold in dry weather.
What's normal
It is slow-growing with irregular layered fans; a few older shaded interior sprays may turn brown. A garden-size estimate is not a promise that growth stops at a particular height.
When to call
Call for browning that starts at shoot tips and spreads, a completely brown side, a loose base or persistent decline in wet soil. Record irrigation and exposure; browning from drought, roots and disease needs different responses.
Confirm
Confirm the installed variety, local winter suitability, soil drainage, irrigation settings and the installer's establishment plan at handover. Confirm the dwarf cultivar and eventual room for its form. Agree any staking review and keep irrigation emitters accessible beneath the branches.
Azalea 'Hino Crimson', #2 potRhododendron 'Hino Crimson'3
Care
First weeks
Check the original rootball and nearby soil several centimetres below the surface, especially in warm or windy weather; rain or a wet surface can hide a dry rootball. Water slowly at soil level when it is drying, soaking the roots and surrounding soil, then allow drainage. Adjust to actual moisture and local watering rules; never leave roots standing in water. This shallow-rooted evergreen azalea needs steady moisture while it settles; shelter from hot afternoon sun and drying wind.
Ongoing
Keep a loose mulch over the root area, clear of stems, and weed by hand rather than digging through shallow roots. Keep the soil moist but airy in an acidic bed. Avoid lime, frequent feeding or piling compost onto the root collar. Check soil pH before treating yellow foliage.
Seasons
'Hino Crimson' flowers on shoots formed before spring. Shape lightly just after flowering, leaving time for next year's buds; do not shear in autumn. Remove spent flowers gently without snapping new shoots. Reduce watering when cool-season rain keeps soil moist.
What's normal
A small amount of older leaf drop, bronzing in cold weather and a shorter first bloom are possible. The plant remains evergreen overall.
When to call
Report rapid whole-plant wilt, blackened stem bases, spreading dieback or persistent yellow leaves with green veins. Check soil moisture before adding water or fertilizer. All parts are harmful if eaten; keep prunings away from children and pets.
Confirm
Confirm the installed variety, local winter suitability, soil drainage, irrigation settings and the installer's establishment plan at handover. Confirm acidic soil and whether summer shade or irrigation needs adjustment.
Japanese forest grass, #2 potHakonechloa macra 'Aureola'5
Care
First weeks
Check the original rootball and nearby soil several centimetres down, especially during warm or windy weather. Rain or damp mulch can conceal dry roots. Water slowly at soil level when it is drying, soaking the roots and surrounding soil, then allow drainage. Adjust to weather, drainage and current local watering rules; do not leave roots standing in water. Japanese forest grass needs consistent moisture while establishing; beneath trees, confirm irrigation reaches its roots.
Ongoing
Keep loose mulch over the roots, clear of stems and crowns, and hand weed without digging into shallow roots. Grow 'Aureola' in cool part shade and humus-rich, moist but draining soil. Protect from intense afternoon sun and dry wind. It is a woodland grass, so do not treat it like a drought-tolerant gravel-garden grass. Avoid heavy fertilizer.
Seasons
Leave faded foliage for winter if desired. Cut or remove dead blades in late winter/early spring before the new shoots extend, keeping tools above the crown. Divide only when necessary as growth resumes in spring; it forms a clump slowly and need not be split annually.
What's normal
Golden striped leaves become greener in deeper shade and can develop autumn pink tones. The arching waterfall habit is natural. Brown winter foliage and a late, slow spring emergence can be normal dormancy.
When to call
Ask for help if new blades repeatedly scorch despite suitable moisture, the crown softens or no fresh shoots appear in the local growing season. A few nibbled leaves may be slugs; inspect before choosing any control.
Confirm
Confirm the installed variety, local winter suitability, drainage, irrigation settings and the installer's establishment plan at handover. Confirm summer shade, water coverage and space for the cascading leaves over the edge of the bed. Keep other plants from smothering the crown while this slow-growing grass establishes.
Pieris 'Mountain Fire', #3 potPieris japonica 'Mountain Fire'1
Care
First weeks
Check the original rootball and nearby soil several centimetres down, especially during warm or windy weather. Rain or damp mulch can conceal dry roots. Water slowly at soil level when it is drying, soaking the roots and surrounding soil, then allow drainage. Adjust to weather, drainage and current local watering rules; do not leave roots standing in water. Pieris has fine shallow roots and needs steady moisture while establishing. Shelter tender new shoots from strong drying wind.
Ongoing
Keep loose mulch over the roots, clear of stems and crowns, and hand weed without digging into shallow roots. Maintain an acidic, moist but draining bed in partial shade or a suitable cool sunny position. Avoid lime, deep cultivation and routine high-nitrogen feeding. Use a soil test to guide amendments if leaves turn persistently yellow.
Seasons
Remove dead or damaged shoots and, if needed, shape lightly just after flowering; avoid cutting off the next flower buds later in the year. Do not remove red new leaves as though diseased. Refresh mulch without raising the soil level around the stem and check summer moisture.
What's normal
'Mountain Fire' is grown for bright red young leaves, which later turn green. White spring flower clusters and some old-leaf shedding are normal. Late frosts may mark the newest tips.
When to call
Call for repeated yellowing between green veins, widespread stippling with dark specks under leaves, wilt in moist soil or spreading black stems. Check for lace bugs and root/drainage issues before treatment. All parts are harmful if eaten; keep clippings from children, pets and livestock.
Confirm
Confirm the installed variety, local winter suitability, drainage, irrigation settings and the installer's establishment plan at handover. Confirm the cultivar, soil acidity and summer shade. An acid-loving label does not justify adding acidifiers or fertilizer without testing and a locally appropriate plan.
Learn more
Sweet box, #2 potSarcococca confusa1
Care
First weeks
Check the original rootball and nearby soil several centimetres down, especially in warm or windy weather. Rain or damp mulch can hide dry roots. Water slowly at soil level when it is drying, soaking the roots and surrounding soil, then allow drainage. Adjust to weather, drainage and current local watering rules; never leave roots standing in water. Sweet box is often placed in dry shade under eaves or trees; check that water actually reaches its new rootball.
Ongoing
Keep loose organic mulch over the roots, clear of stems and crowns, and hand weed without damaging shallow roots. Provide shade/partial shade and humus-rich, moist but draining soil. Established plants can tolerate some dryness, but young ones need reliable moisture and hot sun can scorch leaves. Avoid deep digging around roots and piling mulch against stems.
Seasons
Little pruning is needed. If clearance or shaping is necessary, trim lightly after the winter flower display, selectively removing dead or awkward shoots. Keep the natural branching rather than hard shearing just before flowering. Check summer moisture beneath dense evergreen cover and reduce irrigation when seasonal rain supplies the soil.
What's normal
Tiny white winter flowers may be noticeable by scent before appearance. Black berries can follow, and some old leaves naturally shed while the shrub remains green. Slow early growth is not necessarily a problem.
When to call
Ask for advice on widespread pale leaves, repeated scorch in shade, soft bases or persistent wilt after soil moisture has been checked. Do not treat ornamental berries as food or leave clippings where children or pets may chew them.
Confirm
Confirm the installed variety, local winter suitability, drainage, irrigation settings and the installer's establishment plan at handover. Confirm Sarcococca confusa, shade exposure and eventual space near the entry/path. The scent can be strong close to a doorway, so agree the location and any clearance trimming.
Blue fescue 'Elijah Blue', #1 potFestuca glauca 'Elijah Blue'3
Care
First weeks
Check the original rootball and nearby soil several centimetres below the surface, especially in warm or windy weather; rain or a wet surface can hide a dry rootball. Water slowly at soil level when it is drying, soaking the roots and surrounding soil, then allow drainage. Adjust to actual moisture and local watering rules; never leave roots standing in water. For this small grass, water the rootball rather than repeatedly wetting the leaf base. Its mature low-water habit develops only after roots spread.
Ongoing
Grow 'Elijah Blue' in sun and sharply drained soil; avoid rich feeding and persistently damp mulch against the tuft. Once established, allow soil to dry between needed waterings. Blue fescue often struggles more with winter wet and summer humidity than with lean soil.
Seasons
In early spring, comb out loose brown blades with gloves or trim weathered foliage above the living base before fresh growth lengthens. Spent flower stems can be clipped. Divide or replace ageing clumps if the centre dies out, retaining healthy outer sections.
What's normal
Blue-grey colour is strongest in suitable light and may dull in winter or heat. A few brown blades and a hollow centre in older clumps are common ageing features, not automatically a watering failure.
When to call
Request a drainage review for a soft, brown crown, rapid collapse or whole clumps dying after wet weather. Do not respond to browning by watering daily without checking the soil; that can worsen rot.
Confirm
Confirm the installed variety, local winter suitability, soil drainage, irrigation settings and the installer's establishment plan at handover. Confirm whether the planting is in mineral/gravel mulch or bark and agree how to keep crowns clear. Expect periodic division or replacement as normal maintenance, not a permanent turf-like cover.
Steel landscape edging, 4 in14.23 m
Care
First weeks
Steel landscape edging, 4 in defines a bed/lawn boundary. Confirm exposed height, joints and stakes/bedding at handover. It is not a step, guard or retaining wall. Learn its position before mowing and keep children clear of sharp or broken sections.
Ongoing
Brush debris away and keep soil/grass from hiding the top/stakes. Clean with water and a material/finish-compatible mild cleaner if needed. Avoid solvents, heat tools and impacts from mower blades/wheels or powered trimmers.
Seasons
After frost, rain and gardening, look for heaving, separated joins, loose supports or new trip edges. Return only loose mulch to its bed, leaving installed supports undisturbed. Keep mower wheels/blades clear at all seasonal cutting heights.
What's normal
Marks on powder-coated steel may expose it to corrosion. Protruding stakes, sharp edges, new lean or spreading rust need attention; this is coated steel, not intentional weathering steel.
When to call
Call for loose supports, recurring frost movement, broken sections or sharp/tripping edges. Isolate the hazard; never hammer blindly where services or irrigation may be buried. Have bedding/stakes corrected rather than raising soil around a failed section.
Confirm
Confirm coating/touch-up system, stake layout and safe top profile. Inspect before mowing; do not grind protection off or substitute a bare sharp strip. The steel specification reference is a material example, not proof of the installed brand.